Back in 2024, I shared a post about the tools I used to build my personal blog. Some of those tools are still part of my stack today, while others have gradually been replaced.
Choosing project structure and development tools
The first thing I want to talk about is the monorepo setup. I started introducing it at my first job, and I’ve been using it consistently in my personal projects ever since. As someone who handles both frontend and backend, a monorepo has saved me a lot of time managing multiple apps and shared internal packages.
Turborepo (Monorepo)
I’m currently still using Turborepo to manage my monorepo setup. I’ve tried Nx in the past, but there are three main reasons I ended up sticking with Turborepo:

-
Standard ecosystem approach: Turborepo is built on top of JavaScript package manager workspaces. Compared to Nx, which relies heavily on plugins and its own custom code, Turborepo feels lighter and more in line with ecosystem standards.
-
More control over source code: Nx wraps your code in plugins and abstraction layers, while Turborepo lets you keep direct control over your tooling configuration.
-
Less configuration overhead: Turborepo can infer a lot of what your repo needs, so you end up writing fewer config files than you would with Nx.
Overall, Turborepo has been more intuitive and faster to work with for me, and it saves me from spending too much time digging through documentation.
The Vite ecosystem
I still remember when most of my React work was done with Create React App, and some older company projects were built on it too. Back then, we had to manually optimize the webpack config, and once a project grew bigger, every commit during local development could take 20–30 seconds before the browser reflected any changes. Memory usage was another story altogether.
Fast‑forward to today: Vite has been mainstream for quite some time. I’ve helped migrate several company projects from CRA to Vite, and the difference in local development and CI/CD workflows has been huge. On top of that, Vite’s ecosystem has expanded into things like Vite+, which helps centralize and manage almost all of your development tooling in one place.
A few tools in the Vite ecosystem that I’m actively using now:
-
OXC – A high‑performance toolchain and compiler infrastructure for JavaScript/TypeScript written in Rust, aiming to be the fastest across the entire toolchain.
-
Rolldown – A next‑generation JavaScript bundler written in Rust, designed to become Vite’s unified underlying bundler and eventually replace the current mix of esbuild and Rollup.
-
Vitest – A next‑gen test framework powered by Vite, built specifically for Vite projects and focused on delivering a great developer experience (DX).
I used to rely on ESLint and Prettier for almost all my projects, and they’ve been with me for quite a long time. But this year I switched everything over to OXC’s Oxlint and Oxfmt. The main reason is performance: ESLint and Prettier are written in JavaScript, and the speed difference is noticeable. Since most of my projects are monorepos, I often ran into issues where the local ESLint server would freeze, and I even had cases where VS Code crashed. That pushed me to adopt OXC. Another reason is that I wanted to align my build tools more closely with Vite and keep the toolchain as unified as possible.
Backend development
Let me start from the backend. When I work on a project, I usually begin with database design, then move on to API design, and only after that do I focus on the frontend. Because of that, I’ll first go through the tools and architectural choices I use on the backend. For now, my backend work is still primarily based on Node, so the examples here will mostly revolve around the JavaScript ecosystem.
Here are a few backend issues I’ve been running into most frequently lately:
-
Environment variable management
-
Database migrations and configuration
-
Queue architecture design
Environment variable management
In JS, we all know we can use process.env to read environment variables from the system. The problem is: if we access those variables in random places across different services, they become very hard to manage in a consistent way. Some variables might be critical to the system, yet there’s no validation around them, which can easily lead to runtime errors. And if you ever rename a variable, you’re stuck manually searching for all the places where it’s used.
If we have a single, centralized package to define and validate envs, it becomes much easier to manage, and with TypeScript on top, we also gain type‑safe development.
T3 Env
This is where I want to introduce a library I now use in basically every project, both frontend and backend: T3 Env.
"Wait, frontend has environment variables too?" I’ll get back to that later when I talk about frontend tools.
T3 Env is a tool that helps you define, validate, and transform environment variables in your project, so you don’t end up discovering missing or invalid envs only at build or runtime.
What this tool actually does
-
Lets you define your envs via a schema, and automatically validates them when the app starts.
-
After validation, the envs you use in your code are type‑safe, can have default values, and can be transformed before use.
-
Type‑safe envs: full TypeScript autocomplete and type checking, so you no longer have to directly access
process.env.FOO. -
Standard Schema support: works with any validator that follows the Standard Schema spec (Zod, Valibot, ArkType, Typia, etc.).
-
Server / client separation: uses Proxy tricks to prevent server‑only envs from leaking into the client bundle or being accidentally used on the client.
Why not just write a few lines of Zod yourself?
In the docs, there’s a common Zod example: you write envVariables.parse(process.env) and then extend ProcessEnv with the inferred types.
import * as z from "zod";

const envVariables = z.object({
  DATABASE_URL: z.string(),
  CUSTOM_STUFF: z.string(),
});

envVariables.parse(process.env);

declare global {
  namespace NodeJS {
    interface ProcessEnv extends z.infer<typeof envVariables> {}
  }
}
This kind of hand‑rolled solution has a few drawbacks:
-
Transformation and defaults: parsing
process.envdirectly doesn’t mutate the original object. That means the type reflects the transformed shape, but the actual values are still raw strings, so the types and runtime values are out of sync, and defaults can’t be handled cleanly. -
Multi‑environment behavior: frameworks like Next.js will treeshake env variables that aren’t accessed directly from
process.env. A naive implementation can break in certain runtimes. -
Client‑side validation: importing the server env schema into the client will blow up, because those variables simply don’t exist on the client. T3 Env works around this using Proxy + safe parse to avoid that trap.
Database migrations and configuration
In the past, when writing backend SQL, we often reached for an ORM to avoid SQL injection and improve maintainability. The idea is to lean on object‑oriented concepts like classes, objects, and methods to describe your data models and have the ORM generate the SQL statements under the hood.
The biggest downside, of course, is still performance. Because ORMs do a lot of mapping and transformation behind the scenes, they tend to be noticeably slower than writing raw SQL by hand.
That said, ORMs still come with some real advantages:
-
Maintainability: ORMs abstract away low‑level SQL so developers can focus more on business logic.
-
Portability: If you ever need to switch databases in the future, you can usually get away with fewer code changes.
-
Security: A well‑designed ORM makes it much easier to avoid SQL injection vulnerabilities.
All of that is pretty standard, but there’s one aspect I find especially important: database migrations. Most modern ORMs ship with a migration system. It’s not just about auto‑generating SQL for you—the key benefit is that you get version control for your schema changes.

Take TypeORM as an example: a migration typically exposes two important methods, up and down.
import { MigrationInterface, QueryRunner } from "typeorm"


export class PostRefactoringTIMESTAMP implements MigrationInterface {
    async up(queryRunner: QueryRunner): Promise<void> {}


    async down(queryRunner: QueryRunner): Promise<void> {}
}-
up– Describes the schema changes you want to apply, i.e. the SQL that runs when you migrate forward (renaming columns, adding columns, creating new tables, etc.). -
down– Describes how to undo whatupdid, i.e. the SQL that runs when you roll back the last migration.
The nice thing about using these ORM‑style tools is that you can avoid writing all your migration SQL by hand. If you care a lot about performance, you can still lean more heavily on their SQL builder APIs to reduce some of the overhead that a full ORM usually brings. Or you can go with something like Kysely, a type‑safe SQL query builder that gives you strong TypeScript types without the weight of a full ORM layer.
Queue architecture design
I’ve written before about solving a deployment issue with Vercel Workflow Devkit, and that’s actually the same library I now use a lot when dealing with RAG pipelines and webhooks. It’s become one of my go‑to tools whenever I need something more reliable than a simple "fire‑and‑forget”"job.
Workflow SDK is an SDK that gives any TypeScript/JavaScript function durability and high reliability, letting you build workflows and AI agents that can pause, resume, and persist their state over time. As a developer, you don’t have to set up your own message queue, retry logic, or persistence layer—instead, you just write normal async/await business logic, and WDK takes care of scheduling, retries, and state management for you.
import { createWebhook, fetch } from "workflow";


export async function validatePaymentMethod(rideId: string) {
  "use workflow";


  const webhook = createWebhook();

  // Trigger external payment validation with callback to webhook URL
  await fetch("https://api.example-payments.com/validate-method", {
    method: "POST",
    body: JSON.stringify({ rideId, callback: webhook.url }),
  });


  // Wait for payment provider to confirm via webhook
  const { request } = await webhook;
  const confirmation = await request.json();


  return { rideId, status: confirmation.status };
}
The World abstraction layer
A World is the interface that connects your workflows to the underlying infrastructure, and it’s responsible for three main things: storage (state and events), queueing (scheduling and execution), and streaming (real‑time data flow). By implementing a World, you can run workflows on top of any custom infrastructure you choose.
The one I use most often is @workflow-worlds/redis, which is a World implementation built on Redis and BullMQ.
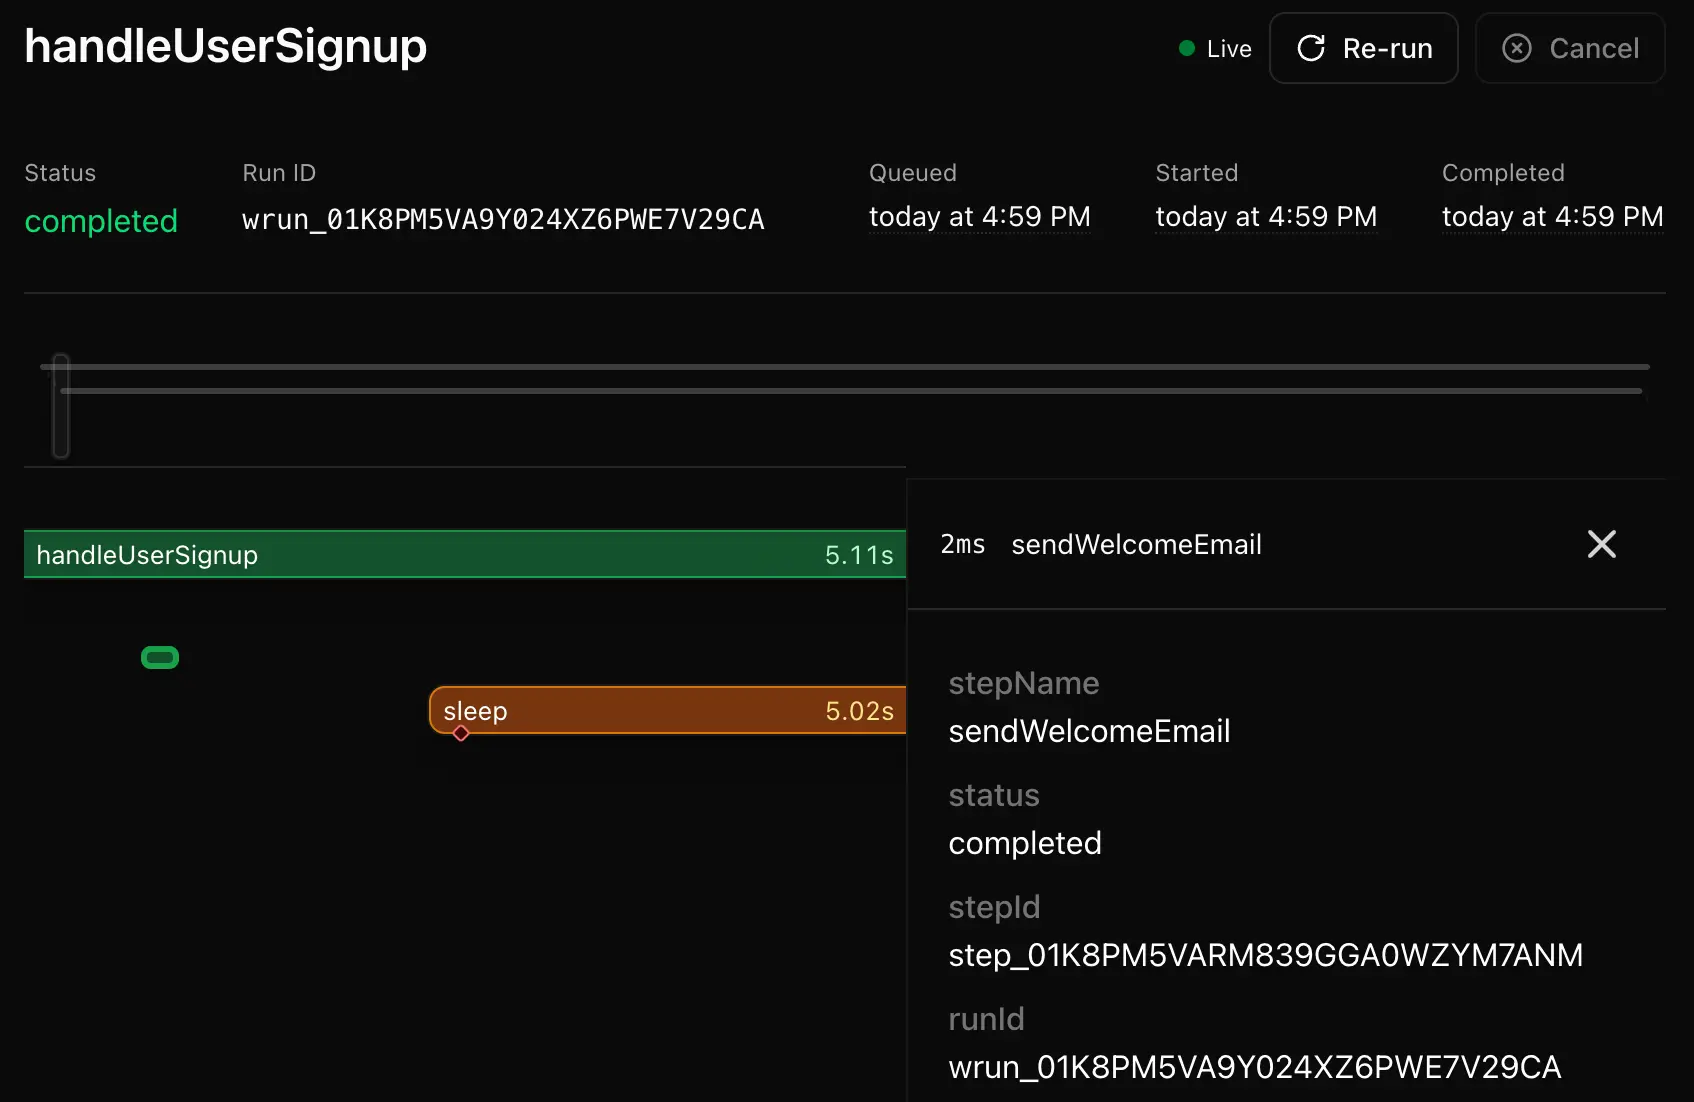
On top of that, Workflow also comes with a visual inspect interface for observability, which makes it much easier to design, understand, and debug queue‑based architectures. For me, that visibility is a big reason why I prefer building queues on Workflow SDK instead of hand‑rolling everything from scratch.
Frontend development
To wrap things up, I want to go over the tools and architectural patterns I use on the frontend. In the past I’ve mainly worked with React and Vue, and since both of these frameworks are less opinionated than something like Angular, I ended up borrowing a lot of ideas from my previous NestJS experience to structure my frontend code. In this section, I’ll focus on the React ecosystem first.
Must‑have libraries for React development
When building React web apps, third‑party libraries usually fall into two big categories: state management and data validation. In my internal systems and in things like the Donkin.AI trading interface, I relied heavily on these types of libraries to keep the UI logic manageable and consistent.
State management patterns in React
Back when I first learned React, I started with Redux for external state management, usually paired with Redux‑Saga or redux‑thunk to handle asynchronous actions. Most of those async actions were just API calls, but the typical approach meant writing a bunch of thunks and reducers to deal with requests, caching, and loading states over and over again.
This is where RTK Query comes in and solves a big part of that problem.
-
It handles the full data fetching and caching lifecycle for you, including loading states, de‑duping requests, optimistic updates, cache invalidation, and refresh logic.
-
It treats remote server state as a separate concern from local UI state, and gives you dedicated tools for data fetching instead of forcing everything through hand‑rolled Redux logic.
import { createApi, fetchBaseQuery } from '@reduxjs/toolkit/query/react'
import type { Pokemon } from './types'

// Define a service using a base URL and expected endpoints
export const pokemonApi = createApi({
  reducerPath: 'pokemonApi',
  baseQuery: fetchBaseQuery({ baseUrl: 'https://pokeapi.co/api/v2/' }),
  endpoints: (build) => ({
    getPokemonByName: build.query<Pokemon, string>({
      query: (name) => `pokemon/${name}`,
    }),
  }),
})

// Export hooks for usage in functional components, which are
// auto-generated based on the defined endpoints
export const { useGetPokemonByNameQuery } = pokemonApi
RTK Query is great for API calls, but sometimes all you need is async state management that isn’t strictly “call this HTTP endpoint”. A classic example is something like window.navigator, where you’re dealing with asynchronous browser APIs rather than a backend API. In those cases, RTK Query can feel a bit awkward, since it’s built mainly around createApi and fetchBaseQuery.
That’s where @tanstack/react-query really shines:
const useQueryGEOLocation = () => {
  return useQuery({
    queryKey: ["geolocation"],
    queryFn: () => {
      return window.navigator.geolocation.getCurrentPosition(
        (position) => {
          return position.coords;
        },
        (error) => {
          throw error;
        }
      );
    },
  });
};
For me, React Query is the tool that finally made server state feel like a first‑class concept instead of just “more Redux state”. It takes care of fetching, caching, refetching, retries, and stale‑while‑revalidate behavior, while letting Redux‑style tools focus on client‑side UI state. These days I usually split my mental model like this:
-
React Query handles everything that needs to talk to the backend (server state).
-
A state management library like Zustand handles UI‑focused client state, temporary data, preferences, and so on.
Now that we have React Query to manage async server data, let’s look back at how we usually handle regular synchronous state with Redux (RTK).
With RTK, we still use reducers to describe synchronous state transitions:
import { createSlice, configureStore } from '@reduxjs/toolkit'

const countSlice = createSlice({
  name: 'count',
  initialState: { value: 0 },
  reducers: {
    incremented: (state, qty: number) => {
      // Redux Toolkit uses Immer under the hood,
      // so this is "draft state", not a real mutation.
      state.value += qty
    },
    decremented: (state, qty: number) => {
      state.value -= qty
    },
  },
})

const countStore = configureStore({ reducer: countSlice.reducer })
This works fine, but you still have the Redux mindset: slices, reducers, and a global store. For many apps that’s perfectly okay, but for smaller or more UI‑centric state, it can feel a bit heavier than necessary.
Now let’s look at Zustand, which is the state management library I’ve leaned on the most recently. The API looks somewhat similar conceptually to Redux (you still have a centralized store), but the code reads much closer to “just using hooks” and it happily supports async actions in the same place as your sync state.
import { create } from 'zustand'

interface BearData {
  count: number
}

interface BearState {
  bears: number
  fetchBears: () => Promise<void>
}

export const useBearStore = create<BearState>()((set) => ({
  bears: 0,
  fetchBears: async () => {
    const res = await fetch('/api/bears')
    const data: BearData = await res.json()
    set({ bears: data.count })
  },
}))
In one of my previous posts, I shared how I used Zustand to manage AI chat messages in a store. That setup had to deal with SSE (Server‑Sent Events) and multiple message streams. Trying to force that into React Query would have been pretty awkward, so having a flexible state store like Zustand made it much easier to keep things organized.
How React handles data validation
Next, let’s talk about data shape validation on the frontend. I usually split this into two parts:
-
Validating API responses.
-
Validating form data before sending requests.
Validating API responses
When handling API responses, I like to use libraries like Zod to validate and parse the returned data. These tools let you define a schema that describes what you expect from the server and then check incoming data against that schema, which helps catch format issues early and prevents subtle runtime bugs. If you expect specific fields or types in a response, Zod lets you enforce that contract explicitly.
On top of validation, you can also use this layer to transform data. For example, you might want to convert timestamps from strings into actual Date objects. I call these modules pipes, inspired by NestJS Pipes, because they are responsible for validating and transforming data.
import dayjs from "dayjs";
import * as z from "zod";

export const UserDetail = z
  .object({
    id: z.string(),
    name: z.string(),
    createdAt: z.string(),
  })
  .transform((value) => ({
    ...value,
    createdAt: dayjs(value.createdAt).toDate(),
  }));

export type UserDetail = z.infer<typeof UserDetail>;
Then we can define a resource function that calls the API. I borrowed the term resource from Angular; the implementation is different, but the idea is similar: a dedicated layer for describing how to fetch data.
import ky from "ky";

import { UserDetail } from "../pipes/user.pipe";

export const getUserDetail = async (
  id: string,
  options?: BaseQueryOptions
) => {
  const response = await ky.get(`/api/v1/user/${id}`, options).json();
  const result = UserDetail.parse(response);
  return result;
};
Validating form data before sending requests
Finally, there’s form validation. With tools like React Hook Form, it becomes much easier to manage forms and validation without drowning in boilerplate. The API is straightforward and flexible, so you can define rules for each field and even reuse schemas from the backend (via Zod) to keep your validation logic consistent across the stack.
In practice, you define validation rules on your inputs, hook them into React Hook Form, and let it handle tracking field state and errors. Users get immediate feedback, you reduce invalid requests hitting your backend, and your overall app becomes more robust and user‑friendly.
Frontend environment variables and config management
When building frontend apps, you’ve probably seen environment variables like VITE_ or NEXT_PUBLIC_. More precisely, these are build‑time environment variables: they are read during the build step of your project. That means when you bundle locally, they come from your local machine’s environment, and when you build in a cloud environment (like Cloud Build), they come from that remote environment. These values are then hard‑coded into the frontend bundle by the bundler, so from the browser’s perspective they are just static constants.
In real projects, we almost always split environments, for example: a staging environment before production, a test environment for QA, and production itself. All of those constants (environment variables) have to be baked into the build before the project is bundled.
FROM node:24-slim AS base

ENV NODE_ENV=production
ENV PNPM_HOME="/pnpm"
ENV PATH="$PNPM_HOME:$PATH"
ENV TURBO_TELEMETRY_DISABLED=1
ENV SKIP_ENV_VALIDATION=1
ENV PORT=8080
ENV HOSTNAME=0.0.0.0

WORKDIR /app

RUN apt-get update && \
    apt-get upgrade -y && \
    apt-get install -y --no-install-recommends \
    python3 make g++ && \
    npm install -g corepack@latest && \
    corepack enable pnpm && \
    rm -rf /var/lib/apt/lists/*

FROM base AS installer

COPY . .
RUN pnpm install --frozen-lockfile --prefer-offline

FROM installer AS builder_staging

RUN cp .env.staging .env.production
RUN NODE_OPTIONS="--max-old-space-size=6144" pnpm build

FROM base AS runner

USER node

COPY --from=builder_staging --chown=node:node /app/package.json ./staging/
COPY --from=builder_staging --chown=node:node /app/public ./staging/public
COPY --from=builder_staging --chown=node:node /app/.next/standalone ./staging/
COPY --from=builder_staging --chown=node:node /app/.next/static ./staging/.next/static
RUN rm -rf ./staging/.env ./staging/.env.*

COPY --from=installer --chown=root:root --chmod=755 /app/builds/docker/docker-entrypoint.sh /docker-entrypoint.sh

CMD ["/docker-entrypoint.sh"]
With this approach, you have to be very careful not to put sensitive data directly into .env files, because Docker will record them in the build history and cache, and in many cases those layers can be inspected or dumped.
If you are building a typical SPA and you don’t want Docker to retain those secrets in its build history, another approach is to provide a runtime config layer that the frontend reads at startup. You can still reuse @t3-oss/env-core to keep things consistent.
- First, define an
env.tsfile. Here,window.Configis the global constant we’ll define per environment later:
import { createEnv } from '@t3-oss/env-core';
import * as z from 'zod';

export const env = createEnv({
	client: z.object({
    VITE_APP_SITE_URL: z.string().min(1),
    VITE_APP_APP_ENV: z.enum(['development', 'local', 'production', 'staging', 'test']),
    VITE_APP_APP_VERSION: z.string().min(1),
    VITE_APP_SENTRY_DSN: z.string().optional(),
    VITE_APP_GTM_ID: z.string().optional(),
    VITE_APP_GTM_AUTH: z.string().optional(),
    VITE_APP_GTM_PREVIEW: z.string().optional(),
    VITE_APP_GA_ID: z.string().optional(),
    VITE_APP_DEFAULT_TIME_ZONE: z.string().min(1),
    VITE_APP_DEFAULT_LOCALE: z.enum(Locale),
    VITE_APP_BACKEND_ENDPOINT: z.string().min(1),
  }),

	runtimeEnv: window.Config,

	emptyStringAsUndefined: true,

	clientPrefix: 'VITE_APP_',
});- Next, create different config files for each environment:
// @ts-check
window.Config = {
	VITE_APP_SITE_URL: 'http://localhost:3000',
	VITE_APP_APP_ENV: 'staging',
	VITE_APP_APP_VERSION: 'develop',
	VITE_APP_DEFAULT_TIME_ZONE: 'Asia/Taipei',
	VITE_APP_DEFAULT_LOCALE: 'zh-TW',
	VITE_APP_BACKEND_ENDPOINT: 'https://example.com',
};- Then, include the config file in
index.html. Here we simply loadconfig.js:
<!DOCTYPE html>
<html lang="en">

<head>
  <meta charset="UTF-8" />
  <meta name="viewport" content="width=device-width, initial-scale=1.0" />
  <link rel="icon" href="/favicon.ico" />
  <meta name="theme-color" content="#000000" />
  <meta name="description" content="" />
  <link rel="apple-touch-icon" href="/logo192.png" />
  <link rel="manifest" href="/manifest.json" />
  <title></title>
</head>

<body>
  <div id="app" class="h-screen w-screen"></div>
  <script src="/config.js"></script>
  <script type="module" src="/src/main.tsx"></script>
</body>

</html>- Finally, when the Docker image starts, we choose which config file to use based on a runtime env variable:
ARG NODE_VERSION=24

FROM --platform=linux/amd64 node:${NODE_VERSION}-alpine AS base

ENV PNPM_HOME="/pnpm"
ENV PATH="$PNPM_HOME:$PATH"

WORKDIR /usr/src/app

RUN apk update && \
    apk add --no-cache \
    libc6-compat \
    git && \
    corepack enable

FROM base AS build
COPY . .

RUN pnpm install
RUN pnpm build

FROM --platform=linux/amd64 nginx:mainline-alpine

ENV CSP_FRAME_ANCESTORS_HOSTS=http://127.0.0.1

COPY --chown=root:root --chmod=0755 ./scripts/cicd/docker/30-config-mover.sh /docker-entrypoint.d/30-config-mover.sh
COPY --chown=root:root ./scripts/cicd/docker/nginx.conf /etc/nginx/nginx.conf
COPY --chown=root:root ./scripts/cicd/docker/templates/ /etc/nginx/templates
COPY --chown=nginx:nginx --from=build /usr/src/app/dist/ /usr/share/nginx/dist/
Here, the APP_ENV variable is the runtime env we provide when running the image:
#!/usr/bin/env sh

export APP_ENV="${APP_ENV:-beta}"
export APP_IMAGE_VERSION="${APP_IMAGE_VERSION:-develop}"
export CONFIG_SOURCE_FILE="/usr/share/nginx/dist/config.${APP_ENV}.js"
export CONFIG_DEST_FILE="/usr/share/nginx/dist/config.js"
export ROBOTS_TXT_SOURCE_FILE="/usr/share/nginx/dist/robots.${APP_ENV}.txt"
export ROBOTS_TXT_DEST_FILE="/usr/share/nginx/dist/robots.txt"

cd /usr/share/nginx/dist || exit 1

if [ -f "${CONFIG_SOURCE_FILE}" ]; then
    /bin/cp -f "${CONFIG_SOURCE_FILE}" "${CONFIG_DEST_FILE}"
    /bin/sed -i "s/APP_IMAGE_VERSION/${APP_IMAGE_VERSION}/g" "${CONFIG_DEST_FILE}"
    chown nginx:nginx "${CONFIG_DEST_FILE}"
fi

if [ -f "${ROBOTS_TXT_SOURCE_FILE}" ]; then
    /bin/cp -f "${ROBOTS_TXT_SOURCE_FILE}" "${ROBOTS_TXT_DEST_FILE}"
    chown nginx:nginx "${ROBOTS_TXT_DEST_FILE}"
fi